Year of the Snake
Happy Chinese New Year to all..................Wishing Prosperity and Good Health, May this year bring slithering good fortune to all.
I have not been up and going lately. No mood and no creative juices to sew my bear nor do my jewelleries. So, beginning of this year, I have only done up some craft like this origami envelope red packet:
Showing posts with label CNY Lantern. Show all posts
Sunday, February 17, 2013
2013 Happy Chinese New Year
Hope that those people I give this red packet to enjoy them as much as I spent my lazy time making them :)
And here's the pussy willow I bought from cold storage for only $20 dollars.
I bought it 4 days before the CNY eve but it did not open even after 1 week past the CNY. So there's no spring in my house for this year. So sad :(
CNY must have all kinds of goodies at home, but with my health conscious younger daughter and changing diet of my old girl, we decided not to buy any this year. But what CNY without any pineapple tart? So, I surf the net and found this Pineapple Cream Cheese tart to bake. It was soft and delicious. Maybe if in good mood next year, will try to make more.
So, here's the link for the tart : wendyinkk.blogspot.sg
Then I came across another recipe for a green tea cookies with white chocolate
This were nice and crisp for matcha lovers: justonecookbook.com
Oh, I didn't mention that my computer refuse to power on and have to sent it in to Sony for repair and I also drop my ipad and broke the screen, this also sent for repair which I ended up with no computer and ipad during the CNY weekend. But, with the baking of cookies, I was very tired by day end and went to bed early. Lucky for me, I extended my vaio warranty and thus need not pay for the repair service which came up to a whooping over $800 as they change the motherboard. But for the ipad, I'm not so lucky. I have to pay $250 just to replace the screen :( What a start of a snakey year.
Anyway, better pray harder and not to get any more breakage in my gadget.
Posted by Bearrie at 2/17/2013 07:53:00 PM 0 comments
Labels: CNY Lantern
Sunday, January 23, 2011
Table Fan
Materials needed:
- 16 x red rectangular packets for fan
- 16 x red rectangular packets for sticks
- 16 x red rectangular packets for stand
- 1 x red square packets for bird
- 1 x ribbon
- 1 x rubber band
- Lots of staples
You can also watch the youtube video from ; http://www.youtube.com/watch?v=FlTOEkD9wVg&feature=related
- 16 x red rectangular packets for fan
- 16 x red rectangular packets for sticks
- 16 x red rectangular packets for stand
- 1 x red square packets for bird
- 1 x ribbon
- 1 x rubber band
- Lots of staples
You can also watch the youtube video from ; http://www.youtube.com/watch?v=FlTOEkD9wVg&feature=related
Posted by Bearrie at 1/23/2011 07:49:00 PM 0 comments
Labels: CNY Lantern
Thursday, January 20, 2011
Gold Fish Lantern
Materials Needed:
- 7 x red rectangular packets
- 2 eyes
- staple and glue
- red thread for hanging and tassel
Instructions:
1. To fold the mouth and fins. Use 2x red packets and fold as shown above. Only staple the mouth area. The final product will be:
2. Staple in the red thread for hanging on the top fin and tassel on the bottom fin. Then staple close the fins. Set aside.
3. For the body part - Fold 2x red packets as shown:
You will get this: only staple one side for inserting the mouth and fins.
5. For the tails, fold 3x red packets as shown;
Using a Large staple, staple the flat ends of the tails together.
Fluff the tails up and glue them to the body part.
Wait at least 5 mins for the glue to dry then glue in the eyes of the fish and finally, tie a ribbon at the tail to form the whole gold fish.
- 7 x red rectangular packets
- 2 eyes
- staple and glue
- red thread for hanging and tassel
Instructions:
1. To fold the mouth and fins. Use 2x red packets and fold as shown above. Only staple the mouth area. The final product will be:
2. Staple in the red thread for hanging on the top fin and tassel on the bottom fin. Then staple close the fins. Set aside.

You will get this: only staple one side for inserting the mouth and fins.
4. Insert the mouth and fins to the body part. Staple to close both the other end of the body. Set aside.
5. For the tails, fold 3x red packets as shown;
Using a Large staple, staple the flat ends of the tails together.
Fluff the tails up and glue them to the body part.
Wait at least 5 mins for the glue to dry then glue in the eyes of the fish and finally, tie a ribbon at the tail to form the whole gold fish.
Posted by Bearrie at 1/20/2011 09:09:00 AM 0 comments
Labels: CNY Lantern
Monday, January 17, 2011
Lucky 8 Lantern
I found the Lucky 8 Lantern tutorial at youtube. Here's the link if you want to see the video:
http://www.youtube.com/watch?v=jsDd8PSS0v8&feature=related
It is very easy to make but must choose a very nice red packet so that it stands out.
Materials needed:
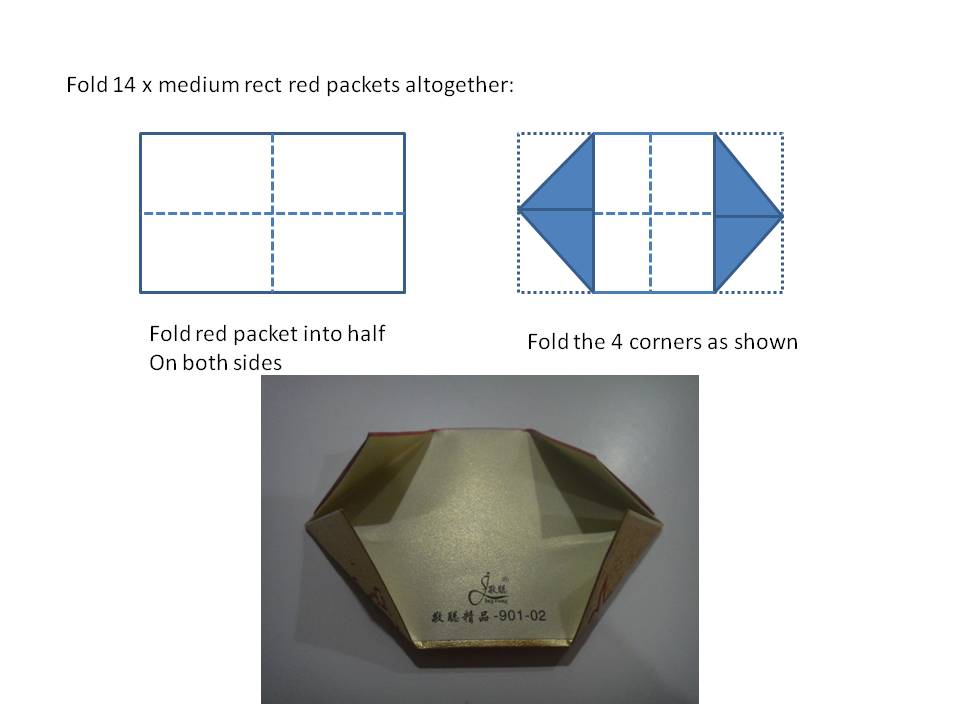
- 14 x medium size rectangular Red Packets
- Lots of staples
- glue
- tassle for bottom and red thread for hanging
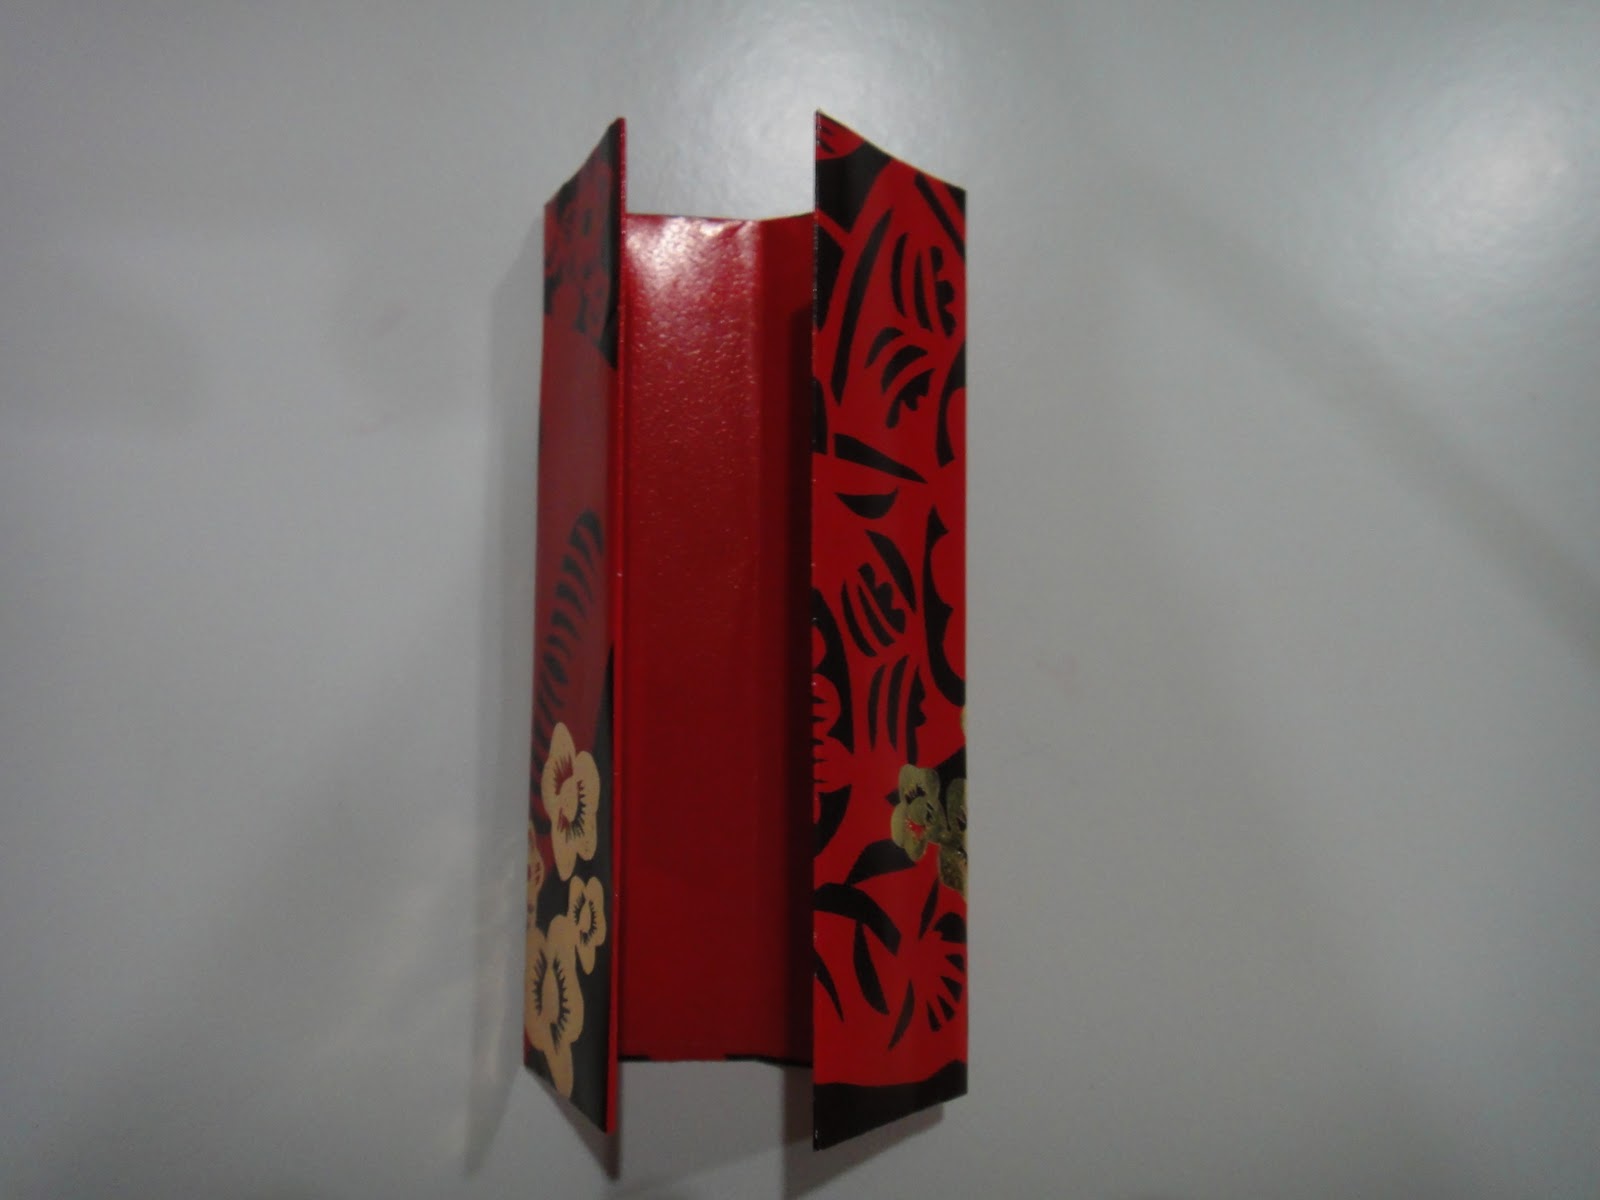
Instruction:
http://www.youtube.com/watch?v=jsDd8PSS0v8&feature=related
It is very easy to make but must choose a very nice red packet so that it stands out.
Materials needed:
- 14 x medium size rectangular Red Packets
- Lots of staples
- glue
- tassle for bottom and red thread for hanging
Instruction:
Posted by Bearrie at 1/17/2011 05:40:00 PM 0 comments
Labels: CNY Lantern
Fan Red Packet Lantern
This Fan Lantern is not easy to make. But if you can follow the video from youtube, then it would be a breeze. Here's the link : http://www.youtube.com/watch?v=T4ch-aLBGFk
I use my left over Ang Pow from last few years but they could not add up to the 12 long packets that I needed. So, I am only able to make 1 fan so far.
What you need:
- 12 x long red packets for fan,
- 13 x medium red packets for sticks (uses square packets)
- 4 x medium red packets for fan handle (uses 8 square packets)
- 1 x square red packets for handle holder
Directions:
1. 13x medium red packets for sticks - this is how it's gonna look above. Set aside.
2. 4x medium red packets for fan handle - fold to look like an accordian or mountain. Join all 4x medium red packets togeether with double-sided tape.
this is how it would look after joining all 4x red packets together. see above. I uses 8x square red packets instead as my left over from last few years.
3. Attached sticks (from No. 1) to the 13x long red packets -
continue till you finish all 13x long red packets. They will look like below;
4. Once you are done, you can attach the mountain/accordian fan handle to the fan.
The above is how the fan will look after attaching the fan handle.
5. To hold the handle in, fold 1x medium red packet into a binder as shown below.
Bind the fan handle, the whole fan will look like below;
I put a rabbit below the fan to make it look cute :). Anyway, here's wishing all a Hopping Rabbit Year with full of Happy and Leaping Good Health............ Hope this tutorial is clear enough for my next year CNY project.
I use my left over Ang Pow from last few years but they could not add up to the 12 long packets that I needed. So, I am only able to make 1 fan so far.
What you need:
- 12 x long red packets for fan,
- 13 x medium red packets for sticks (uses square packets)
- 4 x medium red packets for fan handle (uses 8 square packets)
- 1 x square red packets for handle holder
Directions:
1. 13x medium red packets for sticks - this is how it's gonna look above. Set aside.
2. 4x medium red packets for fan handle - fold to look like an accordian or mountain. Join all 4x medium red packets togeether with double-sided tape.
this is how it would look after joining all 4x red packets together. see above. I uses 8x square red packets instead as my left over from last few years.
3. Attached sticks (from No. 1) to the 13x long red packets -
continue till you finish all 13x long red packets. They will look like below;
4. Once you are done, you can attach the mountain/accordian fan handle to the fan.
The above is how the fan will look after attaching the fan handle.
5. To hold the handle in, fold 1x medium red packet into a binder as shown below.
Bind the fan handle, the whole fan will look like below;
I put a rabbit below the fan to make it look cute :). Anyway, here's wishing all a Hopping Rabbit Year with full of Happy and Leaping Good Health............ Hope this tutorial is clear enough for my next year CNY project.
Posted by Bearrie at 1/17/2011 10:00:00 AM 0 comments
Labels: CNY Lantern
Saturday, January 15, 2011
Double Happiness Fish
Making this angel fish is actually not that difficult. You just have to get the materials ready before you begin.
Materials: (for 1 fish only)
- 10 small red packets
- 8 small cardboard size (same size as the red packets)
- 2 eyes (small or medium)
- ribbons for tails
- gold coin/coin bag tassels ( can get at chinatown for $1 each)
- Red strings for hanging and green beads or pearl
- double-sided tape (small/thin ones) and glue
Method:
1. Cut out 8 cardboard using the fig below as guide into 8 models as shown in the red outline.
2. Insert the 8 models into 8 small red packets. Follow the folding method to get into the fish's body parts.
3. Use double sided tape to tape in the sides and form the fish body.
4. staple in the red string with beads for hanging at the top tip of the fish fin and the gold coin tassle at the bottom of the fish fin. set aside.
5. Fish tail : 2 small red packet
6. insert the tail into the body of the fish back using glue. Leave to dry for at least 5 mins before tying a ribbon around the tail.
7. glue the fish eyes and you are done with the Happiness Fish. Now you can make another one using the same steps and you will have DOUBLE HAPPINESS FISH!
>>>>>>>>>HAPPY CHINESE NEW YEAR 2011<<<<<<<<<<<
Materials: (for 1 fish only)
- 10 small red packets
- 8 small cardboard size (same size as the red packets)
- 2 eyes (small or medium)
- ribbons for tails
- gold coin/coin bag tassels ( can get at chinatown for $1 each)
- Red strings for hanging and green beads or pearl
- double-sided tape (small/thin ones) and glue
Method:
1. Cut out 8 cardboard using the fig below as guide into 8 models as shown in the red outline.
3. Use double sided tape to tape in the sides and form the fish body.
5. Fish tail : 2 small red packet
6. insert the tail into the body of the fish back using glue. Leave to dry for at least 5 mins before tying a ribbon around the tail.
7. glue the fish eyes and you are done with the Happiness Fish. Now you can make another one using the same steps and you will have DOUBLE HAPPINESS FISH!
>>>>>>>>>HAPPY CHINESE NEW YEAR 2011<<<<<<<<<<<
Posted by Bearrie at 1/15/2011 10:27:00 AM 0 comments
Labels: CNY Lantern
Subscribe to:
Posts (Atom)